Posts

Thanks for 2,000 Fans – Free Print Giveaway

As a thank you to my many loyal facebook fans, I’ve decided to give away another free 12×18 print!


The problem is this: I’m having such a hard time deciding which one to give away. This is where YOU come in!


Below are the 5 that I’ve narrowed it down to. Leave me a comment here with the number corresponding to the print that you want to try to win. After a couple days, the giveaway will begin on facebook with the photo that got the most votes.


1) The Grounds

Taken on the campus of the University of Virginia on a cold and foggy fall day


2) Little White Church

Taken in Cades Cove, part of the Great Smoky Mountains National Park


3) Spring at the Lake

Taken in from my favorite spot to catch a sunrise at Radnor Lake State Park


4) Nashville at Night

Taken downtown Nashville on a summer night


5) Deer in the Sun

Taken one humid summer morning at Radnor Lake State Park


Leave me a comment with your pick, please pick only one! Ready go!


Union Station Hotel


Taken during the Scott Kelby World Wide Photowalk 2012


Buy this print here!

Radnor Lake Sunrise

Tuesday morning at Radnor Lake 🙂

Buy prints of this photo here

Thanks for stopping by!

Florida Seagulls

[portfolio_slideshow]

iPhone Photography from Destin, FL

Just a few photos that I took with my iPhone while in Destin, FL. Be looking for the “real” photos soon! 🙂


[portfolio_slideshow]

Game Day!


I’ve had this idea for a while, but I wanted to save it for the football season. I’m a big Tennessee Titans fan so I always get excited when the season starts!


Here are some alternate shots:


The flare to the right is actually the second flash, not the sun 🙂


Had to get the kids involved! Loved this one, lol


The Set Up:


The set up was actually more complicated than it looks! It took my wife and I awhile to get it just right.

Goes like this:

Canon 7d with a Sigma 10-20 lens in the cooler propped up, beer bottles leaning all around :


I used a remote with a 10 second timer to fire it.


I have a Cowboy Studio wireless flash trigger that I used to fire two flashes. One flash was an Alien Bee 800 in a softbox set to about 3/4 power (which is kind of high, but the goal was to beat back  the sun). The box is sitting right next to the cooler, firing up into my face:


The second flash is a 580exii on a light stand on camera right, set to 1/2 power just to add a little fill:


And that’s it! Once I got the set up working right, I just took several photos with different poses. Don’t worry if the neighbors look at you funny 🙂


Also, check out my “Game Day” shot from a couple years ago. This one was a 3 exposure HDR, processed in Photomatix 🙂


Thanks for stopping by!


March’s New Spot – The Natchez Trace Bridge

In March, I decided to visit yet another location that I’ve been meaning to get to for a while now. I headed out to the Natchez Trace bridge near Franklin, TN. The Natchez Trace is a scenic parkway that runs from middle Tennessee all the way to Natchez, Mississippi. The best part about the bridge (and something that I wasn’t expecting) is that it was wide enough for people to walk out on. There was even a parking lot at one end. This allowed us to park and walk out to catch an amazing view of the sun setting:


When looking up images of the bridge, I couldn’t find any shots of it at night so I decided to head out there for sunset with the idea of staying late to shoot the bridge at night.

Once the sun went down, I was able to shoot the bridge from Highway 96 below.

This is one 30 second exposure. I ended up taking about 80 of these shots, stacked them together and that’s how I got the lead photo that shows the motion of the stars. That’s how far the stars move in about 40 minutes.


From Wikipedia:

The Natchez Trace Parkway Bridge is a concrete double arch bridge located in Williamson County, Tennessee, 14 km (8.7 mi) from the northern terminus of the Natchez Trace Parkway. It is 479.1 m (1,572 ft) long and carries the two-lane Natchez Trace Parkway 44.2 m (145 ft) over State Route 96 and a heavily wooded valley. The 177.4 m (582 ft) long main span is symmetrical, while the 140.8 m (462 ft) long second arch is not, due to the slope of the valley at the southern end of the bridge.[2] The bridge is unique in that it does not use spandrel columns to support the deck from the arch. Rather than being evenly distributed along the arch’s length, the weight of the bridge is concentrated at the crown of the arch. The lack of spandrel columns results in a clean, unencumbered appearance.

The bridge, also known as the Natchez Trace Parkway Arches, is the first segmentally constructed concrete arch bridge in the United States.[2] The arches comprise 122 hollow box segments precast in nearby Franklin, each of which was about 3 m (9.8 ft) long and weighed between 26 and 41 metric tons (29 and 45 short tons) .[2] The deck consists of 196 precast post-tensioned trapezoidal box girder segments, each typically 2.6 m (8.5 ft) long. The sections atop the crown of the arch are 3.9 m (13 ft) deep.[2] The foundations and piers of the bridge were cast in place.[2]


Thanks for stopping by!

If you have an idea for a place you’d like to see me shoot, let me know! Leave a comment here or send me an email!

How I did it – Black and White Zoo Animals

I’ve had several people ask about my processing on the photos of the zoo animals. So I decided to create this tutorial to give you a little “behind-the-scenes” look at my processing.

This is what I started with. A fairly simple photo of an elephant taking a drink of water at the Nashville Zoo. This photo was taken with a Canon 7d with the 70-200 2.8L lens.


So the first thing I wanted to do was isolate the elephant from the background. There are many ways to do this and this tutorial does not really cover that. You can find many great tutorials on this by searching Youtube. I will say that I use a program call ReMask by Topaz. It’s really a great program and is very easy to use. Here it is with a black background:


Now, in order to really bring out the textures and wrinkles on this elephant I started messing with the curves tool. I created a curves adjustment layer and gave it a very basic s-curve adjustment to the entire image. This increases the contrast to the entire image


Now I wanted to begin to create a bit of a “strobist” effect. I wanted it to look like the elephant was lit by a single light source overhead. So I ctrl+shift+alt+e, which creates a new layer, and I grab the burn tool. I set it to “midtones” and a very low exposure. I begin to paint the edges with the burn tool. There difference is subtle, but you can really see it on the right hand side, the photo below is darker on the right than the photo above.


Next, because the burn tool darkens the highlights, I did another Curves adjustment layer to brighten the highlights. You can see it is a very simple curves tool where all I did was grab the box on the top right and drag it to the left.


Next was another curves adjustment layer, this one will be used to create a vignette. You can see below, I drag the curves line way down to the lower right. This will darken the entire image but I don’t want to apply this to the entire photo so I mask in the areas that I don’t want to change. Do this by painting with a black brush on the areas you don’t want the curves adjustment to effect. So in this case, the only areas I wanted darker with this layer was on the right hand side of the photo and a little on the trunk of the elephant. You can see how this really darkens the edge and keeps the viewers focus on the center of the image.


Now that I have the contrast pretty close to where I want it, I’ll convert the image to black and white. Again, there are many ways to do this. I use a photoshop plug-in called Topaz BW Effects. There are many options within this plug-in, play with the sliders until you get what you want.


Next, after another ctrl+shft+alt+e, I grab the Burn tool, set it to “shadows” and to a low exposure. I start to “paint” over the image. This will darken the shadows which really makes the textures and wrinkles come out.


After I get that the way I wanted, I needed one more curves adjustment layer to bring back any highlights I may have lost with the burn tool. By dragging the right side of the line up, you brighten the highlights.


And finally, I wanted to add some subtle tones to the image. So, it’s another curves adjustment layer. This time, drag the RGB drop down box to “Red” and drag the top portion of the line up. This will add a slight red hue to the highlights.


After that, while still in the same curves adjustment layer, drag the drop-down box to blue and make another slight adjustment.


Together, these add a nice, but very subtle, tone to the image.


And that’s it! Here is our final product.


Thanks for stopping by. I hope you found this somewhat useful. I realize that this is not the ideal way to show a tutorial of this magnitude but I think you get the idea. Just keep trying and playing with curves etc until you get it how you want it. I actually worked on this image for a little more than an hour, slowly making subtle adjustments until I felt it was just right.


See more of my tutorials HERE including HDR tutorials. Let me know if you found this or any of my other tutorials useful by leaving me a comment!


The Best of 2011 – Landscapes/Cityscapes and Scenics

So 2011 is drawing to a close. I feel like my photography world has grown exponentially this year. It started with the completion of my “This Week at the Lake” project. That was a project that I truly enjoyed and was proud that I made it the entire 52 weeks. I honestly wasn’t sure what I was going to do once that was over. Was I still going to take many photos? Of course the answer was YES!


2011 brought me many new clients and friends. I photographed engagement sessions, family portraits, babies, weddings, and parties. I grew my stock photography collection on Getty Images from just a couple photos to over 180. I’ve licensed photos to companies all over the world and mailed prints to clients all over the US. October brought an amazing opportunity  to display my Radnor Lake photos in a gallery next to extremely popular local artist Phil Ponder. I even covered a couple college football games and the Murfreesboro Christmas parade for HobNob Murfreesboro.


I’m going to break up “The Best Of” posts into sections. This first post features my favorite landscapes, cityscapes or scenic photos. I hope you enjoy them!

This Week at the Lake - 47/52

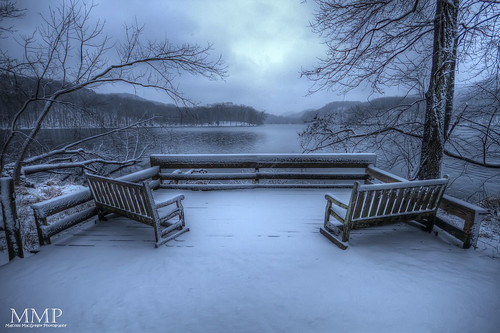
This first shot was taken on a cold snowy morning at Radnor Lake. It was the lead shot for Week 47 of my project. I was the first (and only) one out there. No footprints to mess up the scene! Standing on that deck is where I get a lot of my sunrise photos at Radnor Lake. This time, I decided to include the snow covered deck and benches in the shot. I like how it turned out!


Wrong Side of the Tracks

This is a shot I got at Shelby Park in Nashville. I met a few local photographers there and we walked around taking photos waiting on the sunset. I really liked how this turned out. I think it’s a good reminder to look around when taking photos. Look up, look down. Try to get a unique angle.


Vanderbilt at Night

Years ago, I took a shot similar to this on film and I really liked it. Finally, I made it back there and tried it with my digital. This was taken at Vanderbilt University. I like the colors and lights in this shot.


Lightning - in HDR

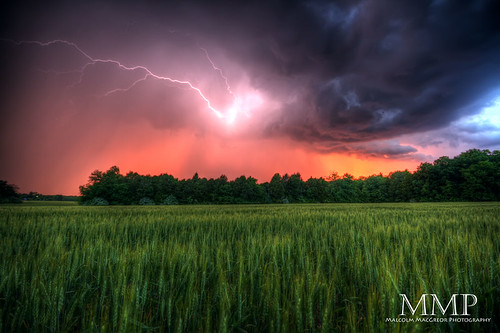
I have to admit, in photography you have to have a LOT of luck. Be skilled enough to put yourself in the right spot at the right time, be skilled enough to know what to do when it happens. But other than that, you need some luck. I was set up to shoot the sunset this evening as some storms were rolling through. I had seen some lighting but not much. As soon as I pushed the button, the lighting streaked across the sky. Seconds later, it began pouring. This was the only shot of this sunset that I got. This might just be one of my all time favorites!


A Self Portrait

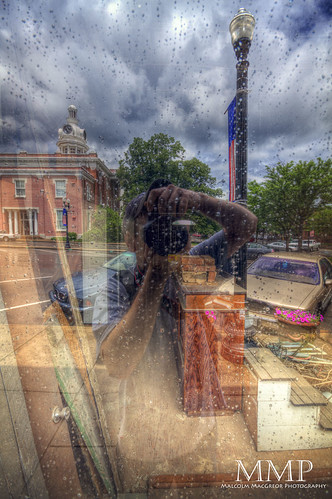
This was my first attempt at a window reflection self portrait. I really liked how this turned out and I’ve done several others. I find them very interesting to look at. Trying to determine what’s inside and what’s reflected. This one was taken downtown Murfreesboro Tennessee. I have an album on facebook that has the others if you are interested in seeing them 🙂


Cannon

As soon as I left work this day, I called my wife and told here we were going somewhere to shoot the sunset. I could tell the skies were shaping up to make for an awesome sunset. We decided to head to the Stones River Battlefield in Murfreesboro and this is the result!


The Linn Cove Viaduct at Sunrise

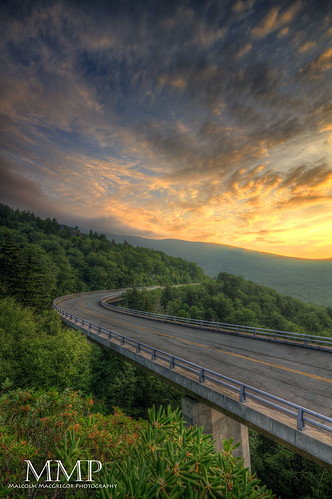
This is the Linn Cove Viaduct on the Blue Ridge Parkway in North Carolina. I was vacationing there and knew that I wanted to get a shot of the viaduct. I scouted out this area the day before and realized that the sun would be rising over this scene. So the next morning (and the last morning of the vacation, so it HAD to be a good sunrise!) my brother and I drove, hiked, climbed in the dark and waited for the sunrise. We were not disappointed as this beautiful sunrise took shape over the viaduct.


Morning Rays on the Blue Ridge Parkway

On the way back to the house from getting the sunrise shot above, we came across these sunrays breaking through the trees onto the Blue Ridge Parkway. I took a couple shots but decided they needed something else in them. I told my brother to go stand in the rays.


LP Field at Sunset

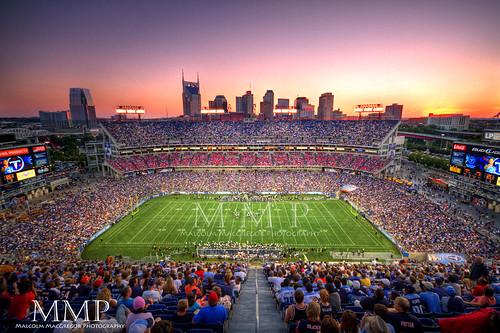
Sometimes you get a shot in your head that you want. It’s rare (at least for me) that it ever happens exactly the way you envisioned it. This one, however, did! I’ve envisioned this shot in my head for a long time. I’ve been to a few Titans games but never at sunset. This year, I was invited by a friend to a preseason game. The timing was perfect and the seats were already near the top. All I needed was some color! Sure enough, the sky started lighting up so I headed to the 50 yard line and got this shot.


Follow the Light

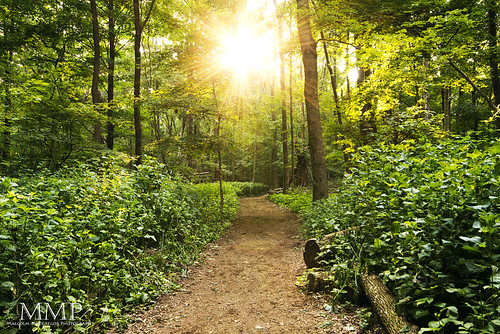
Not much to say about this one, I just really liked how it turned out. I love the light and color and the path leading you in.


Nashville, Tennessee

This is my favorite Nashville Skyline photo taken in 2011. I like the lighting and colors. This is such a classic spot, every time I’m downtown I just have to get another skyline shot. It’s really an impressive scene from the Shelby Street bridge.


Radnor Lake

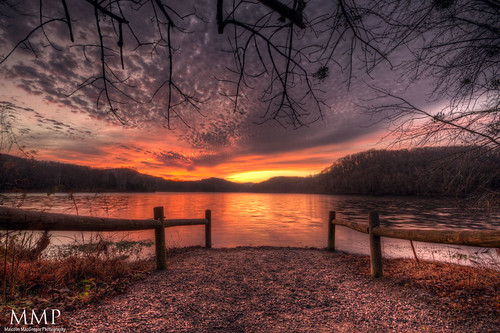
Just another beautiful morning at my favorite spot in Middle Tennessee. When you shoot at the same places over and over, it’s hard to make the photos unique. For this one, I backed up to include the path into the water and waited for the sun to peek over the ridge to give me a flare.


State Line

This one is from my hiking trip along the Appalachian trail. Straight ahead is Jane Bald, and Round Bald. The left of the photo is North Carolina, the right side is Tennessee. This is near Roan Mountain Tennessee.


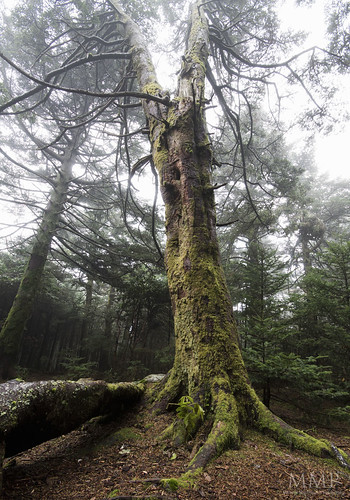
Another from my hiking trip. This tree was near my camping spot on the first night. The fog and the mist gives it a mysterious look.


Foggy Tree

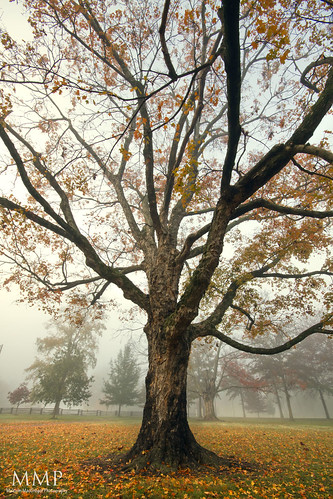
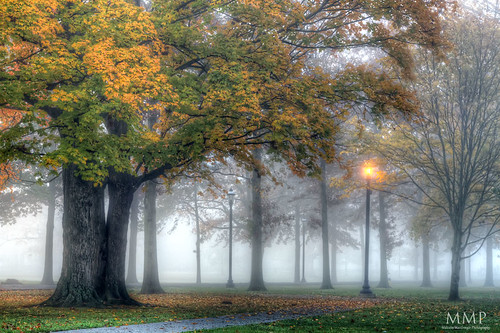
Taken on a foggy morning in Murfreesboro. I just loved the fog, the fall colors, and the look of this old tree. This is one of my top favorites of the year.


Foggy Fall Morning

This was taken on the same morning as the shot above it. I really love shooting in the fog. Everything looks so mysterious.


Radnor Lake Sunrise

Another shot of a Radnor Lake Sunrise. There was so much color in the sky this particular morning.


A Christmas window display

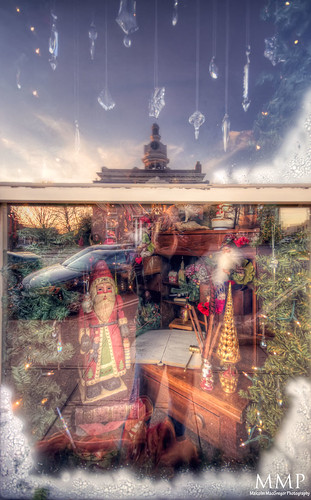
Finally, it’s another shop window/reflections shot. The key to these is to find the right window with enough interesting stuff inside and interesting reflections from the outside. I knew I wanted to get one of these of a shop window with Christmas decorations. I circled the square in downtown Murfreesboro several times trying to find the right window. Finally I came across this one, it has a great display inside and the reflections worked perfectly showing the courthouse clock tower.


And that’s it! Just a few of favorites from this amazing year. Thank you to everyone who continues to support my photography and here’s to an even better 2012!


Don’t forget, most of my photos can be purchased by visiting the Storefront Site.


Are you a photographer thinking about HDR photography? Purchase Photomatix from hdrsoft.com and use the coupon code MALCOLMPHOTO and get 15% off! Then check out my tutorials!


Happy New Year!