This Week at the Lake – 20/52

A little something different for my main post for Week 20. The first black and white photo that I’ve chosen to lead off with. I really liked the light and shadows in this – and of course I love that shallow depth of focus (dof). It may not be as popular as some of my others but it really clicked with me for some reason, probably one I will print.

Here are the other shots from Monday, Wednesday, Thursday and Friday:

Monday

Help needed in identifying this bird! Please tell me if you know!
EDIT – Thanks to Matt Hansen for the ID! This is a Yellow Billed Cuckoo

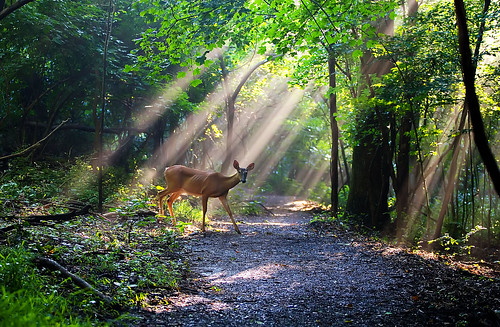
For this one, I was really trying to get a “Deer in the Woods” look, not just a portrait. I think it turned out alright, something I will continue trying to get

Wednesday

Thanks to the nice couple on the bridge who helped my identify this as a Green Heron

Thursday

Friday

Wow, lots of photos this week!
Thanks for looking!

Check out all the previous weeks by Clicking HERE

Don’t miss a week! Subscribe to this blog and you will receive an email every time I post something new!

Franklin, Tennessee

Earlier this week I stopped by Franklin, Tennessee after work to get some photos. Before this, I had zero shots of the downtown area of Franklin.

I got lots of shots, we’ll break it up into categories…

HDR
_______________________________________________________________________________________________________________

There were so many people and cars it was hard getting most of those shots. Once I found a composition I wanted I would have to wait several minutes to get it with no cars…

Black and White
_______________________________________________________________________________________________________________

Downtown Franklin is well suited for Black and White photography

Color
_______________________________________________________________________________________________________________


Most of these color shots looked so good in black and white also, but I needed to throw some color in there!

This Week at the Lake – 19/52

Hope you like the new look here! I’ve been wanting a wordpress template that would put my photos on an all black background and I’ve finally found it! I think it looks much better now….

Week 19 has come and gone. This week I visited Radnor Lake on Wednesday (noon), Thursday (noon) and Friday (early morning).

Wednesday I used my lunch break from work to go to the lake. Usually when I do this, I have to set an alarm on my phone to tell me when to head back to the car. Well, on Wednesday, I was walking around shooting, finding owls and deer, off in my own little world. I remember thinking to myself “seems like I’ve been here a while but I must have more time – my alarm hasn’t gone off yet!”. Shortly after, I suddenly realize the phone is not in my pocket! I headed for the car as quick as I could. Finally I got to the car, there was my phone buzzing away! I had been there for about an hour and fifteen minutes (would still take almost fifteen minutes to get back to the office)! Yikes! Luckily no one was looking for me and I didn’t really miss anything important, I don’t even think anyone noticed…

The skies were great that day so I wanted to get a good lake-scape
This is the same spot that I got the images from for Week 13 and Week 16

I then headed to where I normally see the owls and sure enough…
(I think he’s trying to hide from me 🙂 )

(These are all the same owl)

Also while standing there (waiting for my alarm to ring!) I saw this fawn and her mother cross the path

On Thursday I headed to the lake despite the HOT temperatures (and made sure I had my phone with me)
It was so hot I decided I was not going to walk far or stay long. I parked at the west entrance this time and headed up the lake trail. I didn’t go very far and I came across another owl – I had never seen one in this part of the park before

On Friday, I was able to go early in the morning – getting there just after 6am. I was walking along the lake trail and had made it quite a ways without getting many pictures. I saw lots of deer but nothing was coming out right for me. It was so dark this morning because of hazy/cloudy skies that almost everything I took was blurry. The shutter speeds were 1/20, 1/40 (even at 800 ISO).

I was walking along the path and I heard a bunch of birds being very noisy. There was a small tree nearby with a canopy of branches right on the side of the trail. I ducked under the branches and looked up – there was a Barred Owl that was no more that 10 feet away! I took a couple shots before he was spooked by some people walking.
This is only at 70mm – quality is not that great because it was very dark under the tree. 1/20 shutter speed at f2.8

He flew to a nearby branch where I got a couple more shots before he left

I then started back towards the car. On the way back I saw another Doe with a Fawn. I did everything I could to get a decent shot of these two but nothing seemed to go right. I followed/stalked for at least a quarter mile.

I then watched them emerge from some brush and there was a second fawn. I don’t think it belonged to this doe because she walked off with the other fawn and this one stayed. He came very close to me at one point.

He then wandered off and I headed to the car.

Thanks for looking!

Check out all the previous weeks by Clicking HERE

Don’t miss a week! Subscribe to this blog and you will receive an email every time I post something new!

Stormy Tuesday

On my way home from work yesterday, July 13, I stopped to get a few shots of a rain storm.


You could actually see where it was raining and which direction the storm was moving. I sat and watched it move left to right in front of me.


I pulled out the zoom lens for this one. The sun was setting behind me and was not obstructed by clouds so the light on the green farm was amazing! It really made the green glow against the dark bluish gray sky

Nashville at Night

I recently met up with the Nashville Photography Meetup Group for an evening of shooting in Downtown Nashville.

Since this is a photography blog and you didn’t come here to read, I’ll just post the pictures 🙂


(for a full tutorial on how I processed this image, click HERE)

This Week at the Lake – 18/52

Moving right along! Week 18 already….

I visited Radnor Lake on Monday, Tuesday and Wednesday of this week.

Monday I was off work, so I took the kids to the zoo, after which we picked my wife up from work and headed to the lake. My son loves riding his bike so we brought it with us:

The kids enjoyed themselves, we were able to find deer, squirrels, birds, turtles and we even saw a couple owls!

On Tuesday I stopped by before heading to work. Along the path I found a fawn with, I presume, her mother

Heading back to the car, I got a flower shot. A Rose of Sharon, growing near the house on the dam walkway

The next day I again got to go before work. Arriving at 6 am I wandered up to the spillway bridge to take in the view of the lake from there. Noticed this Lightning Bug on the bridge railing

That’s some major depth of focus! Achieved by using a long focal length (180mm) and a wide open aperture (f2.8)

Further down the path I got another black and white deer portrait

This deer was walking along the path with everyone else!

Thanks for looking!

Check out all the previous weeks by Clicking HERE

Don’t miss a week! Subscribe to this blog and you will receive an email every time I post something new!

How I Did It…. Part 2

I figured it was time for another “How I Did It” post. In this tutorial, I’ll show you everything I did to turn this

into this

_______________________________________________________________________________________________________________

Once again, this is an HDR or High Dynamic Range Image. To create an HDR image you need to take multiple exposures (usually 3 but can be us many as you want) of the same scene.

To do this, I put the camera mode in Aperture Priority and set the auto bracket to (-2, 0, +2). This will make the camera take 3 consecutive shots, one exposed properly, one underexposed by 2 stops, and one overexposed by 2 stops.

Here are the 3 shots with their exposure values:

0 ev 2.5 seconds @ f/5.6


-2 ev 0.6 seconds @ f/5.6


+2 ev 10 seconds @ f/5.6

These 3 images are opened directly into Photomatix. I use Photomatix for all of my HDR’s. If you are interested in buying Photomatix, use the coupon code “malcolmphoto” for a 15% discount! It’s already at a great price ($99) and even better with the discount.

You are then presented with “Generate HDR – Options” – here is what I choose:

I always use the “Details Enhancer” option. Here are my settings there:

It’s important to remember that while I used these settings on this image, they may be completely different for my next image. You really need to play with the sliders and get a feel for what they do to your image. Then you can make adjustments that suit your taste. It’s also important to remember that is doesn’t stop here! There are many things that need to be corrected/adjusted in photoshop.

At this point I save it as a .tiff and head to photoshop……….

_______________________________________________________________________________________________________________

The first thing I need to do in photoshop is correct the lens distortion. Because I shot this with a super wide angle lens (Sigma 10-20 @ 10mm) the buildings all look as if they are leaning.
To correct this – go to Filter => Distort => Lens Correction
In the “Transform” sections, grab the “Vertical Perspective” slider and drag it to the right until the buildings are straight:

After this, you will need to crop out the blank spots at the bottom of the image.

Now we are ready to work on the image.

The first thing I did was do a “Levels” adjustment layer – Layer => New Adjustment Layer => Levels
I made this pretty dramatic because I wanted to darken the sky a lot to hide the lens flare and the noise (and to make it look more like night should look!)

Once I did this, you can see I “masked out” the bottom part of the image where the building are. To mask something out, grab the brush tool and paint black on the areas you don’t want affected by the adjustment layer.

You can see this really darkened the sky but there are still a few areas that need some work. So I did a “Stamp Visual” (ctrl/cmd+shift+alt+e). On the new layer, I painted black directly on the image to blacken out the few remaining areas

Next I wanted to tone down the terrible orange/yellow light from the street lights. To do this I used a “Cooling” photo filter.
Layer => New Adjustment Layer => Photo Filter

This kind of took away too much color in my mind, so I did a new “Saturation” adjustment layer
Layer => New Adjustment Layer => Saturation

Then I did a separate saturation adjustment layer where I desaturated the yellows

and the reds

Now it’s looking better!

Next I do another levels adjustment layer for the buildings.
Layer => New Adjustment Layer => Levels

Then I do a slight curves adjustment
Layer => New Adjustment Layer => Curves

Next, I do a Color Balance adjustment
Layer => New Adjustment Layer => Color Balance

I make both the “Shadows” and “Highlights” have the same settings

Now we are just about through!

I do another stamp visual (ctrl+shift+alt+e)
I then sharpen this layer using unsharpen mask
Filter => Sharpen => Unsharpen Mask

Then I use a noise reduction software called Imagenomic. This really is an awesome plugin! I use it on every single image now. It does an incredible job at reducing the noise without reducing the sharpness. I tried several other noise reduction plugins but none worked near as well.

Last but not least, I grab the “Dodge” tool and I dodge some areas of the image. In this one in particular, I dodged the windows with the reflections to the right, the building to the left and some of the cars on the street. This brightens them some and really makes them pop!

And then I was finished!

The Final Product:

Thanks for looking! I hope you found this helpful. Please ask questions if you have them, I’ll try by best to answer.

Remember,
If you want to know “How I Did It” for any photo on my flickr photostream, leave me a comment on this page or send me a flickr mail. I’ll be glad to make it my next “How I Did It” entry!

Also, as I mentioned in my first How I did It post, here are some helpful links for learning more about HDR:
Stuck in Customs
HDR Exposed
HDR (a flickr group)
Tutorial Collection at My First HDR flickr group

Helpful links for learning more about Photoshop:
chromasia photoshop tutorials
Photoshop Support Group
Photoshop Tutorials by Allan Gengler
Actions by Allan Gengler
CoffeeShop Actions

Cades Cove Round Two – The Wildlife

Cades Cove Round One was for landscapes, Cades Cove Round Two is for wildlife! I was absolutely amazed at the amount of wildlife we saw in just the few short hours we were there.

Happy July Fourth!

What better way to celebrate any holiday than with photos!

Here is a July 4th themed shoot of the kids. When I decided to do this shoot this morning I was hoping for a couple of images to put on here. It ended up going so well I have TONS of pictures to put on here! The kids were cooperative and had fun! Hope you enjoy!

Friends and Family – If you would like prints of any of these please leave a comment or send me an email!

This Week at the Lake – 17/52

This Week at the Lake - 17/52
Can you believe that?! ( I paid her $20 to walk there!)

This was a great week at the lake. The weather has cooled some and it was so nice. I had Monday and Tuesday off work, Monday I went to Cades Cove and we came back home Monday evening. Since I already had Tuesday off work, I went to the lake! I got there about 6:15 am and was able to walk the entire loop – something I haven’t done in a long time.

I had a feeling I was going to see the same sun rays I saw in Week 15. I was right, as the sun started coming through the trees, the rays began to shine down. I spotted a few deer nearby and decided I was going to sit there until one crossed the path. It took about 20 minutes, but finally one did. I was shooting away as she watched me the entire time she crossed! I was so excited, I kept checking the viewfinder the rest of the hike to make sure it really happened!

Further along the trail I came up on some more rays:

I did see an owl that morning but could not get a good shot of him before he flew off.

I was sitting on the side of the road watching a Great Blue Heron when this little bird flew up. I’m not sure what type of bird he is and he didn’t stay long.

The Heron I was watching started flying away so I tried some in-flight shots. I followed him all the way back around to the spillway trail. Every time he flew away he just flew further down the trail so I met up with him again and again. I’m sure he was tired of me!

I had made the full loop now and saw that people were filming a commercial there were packing up (they were setting up when I first got there). They had a car waiting and Governor Phil Bredeson came walking out to get in.

You never know what you’ll see at Radnor Lake…..

Wednesday was so nice so I decided to go to the lake during my lunch break. I spotted this fawn sleeping on the edge of the lake

I sat and watched him for a while and he got up to stretch and laid back down.

I went on my lunch break again on Thursday. It was quiet there, I didn’t see much but it was still so nice. I did get this little bird just singing away…

On Friday, I was meeting the Nashville Photography Meetup Group Downtown at 7pm so I had some time after work. I headed to the lake and was able to walk the entire loop again.

A distorted self portrait 🙂

This deer was busy eating the duckweed

Here is a deer that came walking up to me and got so close! This shot is only at 100mm