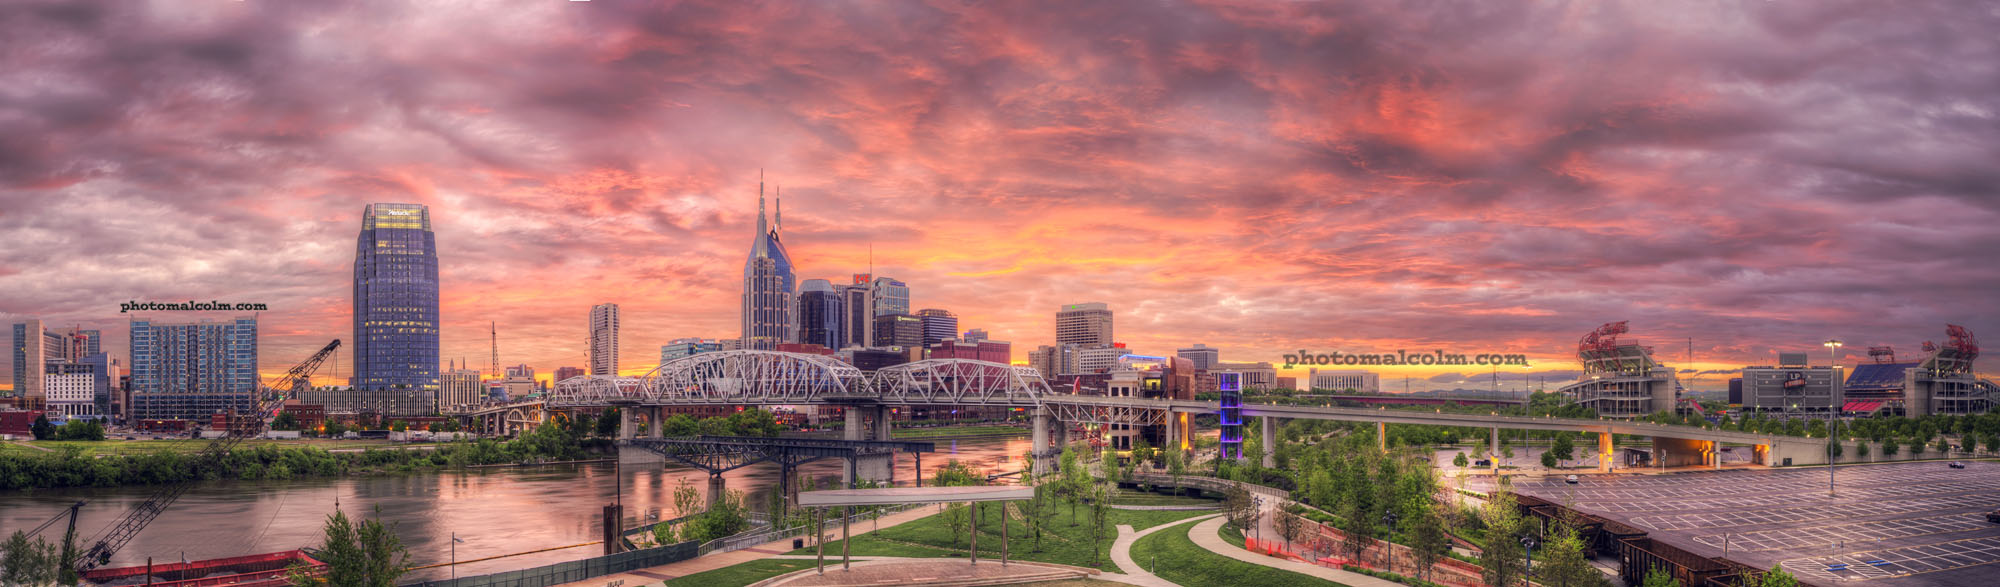
Nashville Sunset Panorama
Click the photo to see it HUGE! 🙂
This is a Panorama merged from 4 horizontal photos, each photo is a 7 exposure HDR blend.
Click the photo to see it HUGE! 🙂
This is a Panorama merged from 4 horizontal photos, each photo is a 7 exposure HDR blend.
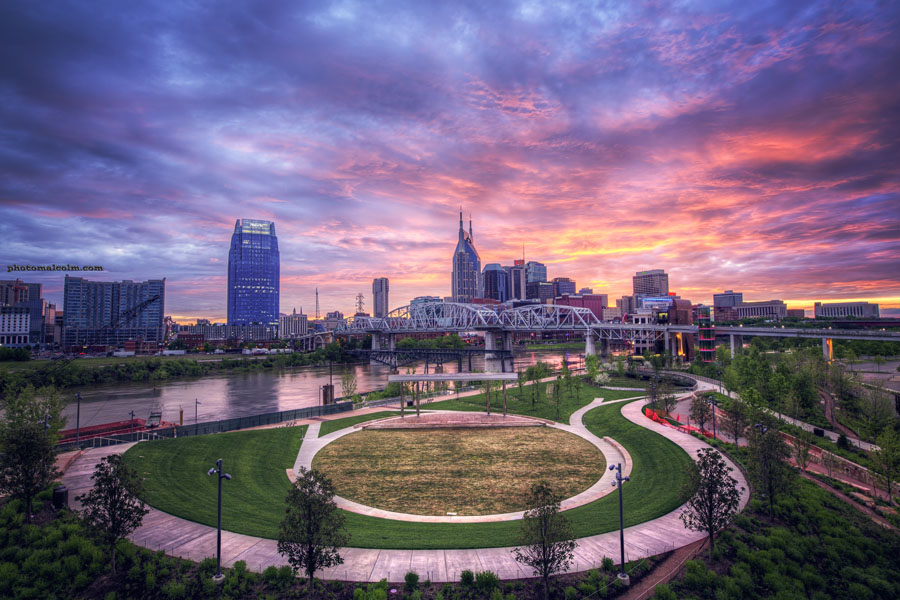
I was in Nashville for an engagement session Sunday evening 4/29. Once we finished we shooting, I decided to wait around to see if the sunset would be nice….. It was 🙂
Want to create high impact, dramatic photos like these!? Malcolm MacGregor Photography is pleased to have teamed up with Photomatix, the program used to create all of my HDR images, to offer you a discount code!
Photomatix is already a very cheap program ($99), but now it’s even better. With the discount code MALCOLMPHOTO, you will receive an additional 15% off! Photomatix can be purchased and downloaded from the HDRsoft website, HERE
After you purchase Photomatix, be sure to check out my HDR tutorials for additional help! As always, let me know if you have any questions!

")


Thanks for looking!

Well, here we are. The final installment of this 52 week project. I’m going for a little bit of symbolism in the lead shot as I’m watching the sun set on this project. I also started the project with a sunrise, so I wanted to end with a sunset.
Radnor Lake is actually a pretty tough place to catch a sunset. There really are no good angles. I had three chances to get a shot of one this week, starting on Monday which was a complete rain out. My second chance came on Tuesday, so I parked at the east parking lot ad tried to capture it from Otter Creek Road:
 This sunset was really amazing. And while I liked how this shot turns out, it doesn’t show most of the color that was there. The sun is actually setting off camera left, behind the hills. What you see at the end of the lake is actually the edge of it.
So my next opportunity came Thursday evening. I decided this time to shoot from the trail that directly faces the sunset. I wasn’t sure how I was going to compose it with all the trees, path, fence, etc. I decided to use the fence in the composition and to put myself in the photo. The result is the lead shot.
A couple others from the final week:


And that’s it for the week and the year! Thanks to everyone who viewed, commented, liked, or supported this effort. It’s been a lot of fun and I feel like I’ve come a long way as a photographer. Have a look at the first few weeks and see if you think I’ve improved. Constantly shooting will help you do that.
If you are a photographer and are thinking about a year long project, weather a 52 or a 365, I highly recommend it. Don’t make too many rules though! It has to be fun for you, it has to be something you want to do. I had to get up at 4:45 in the morning each time I wanted to get to the lake for a sunrise or for early morning shooting. Because of my wife’s work schedule and my son’s school schedule I was able to do this only about once a week, but I actually looked forward to that day. I never once viewed this project as a chore, or wished I hadn’t committed myself by starting this blog or posting on flickr.
Don’t think for a minute that now that this is over I’ll stop going to the lake! Radnor Lake is an amazing place (really early in the morning when there aren’t too many people there 🙂 ) Abundant wildlife and beautiful views. There is ALWAYS something to shoot at Radnor. If you’ve never been, I highly recommend you check it out.
I have some other ideas in the works for other projects, Subscribe to this blog you will receive an email every time I post something new! Or, become a fan on Facebook.
All of the “This Week at the Lake” photos are available for purchase as fine art prints and a portion of the proceeds will be donated to the Friends of Radnor Lake! Send me an email for more info (m_macgregor@comcast.net)
Thanks!
Time for another tutorial!
In this post I’ll show you everything I did to turn this:

into this:

Really not that different is it? But I actually spent a lot of time on those “minor” changes.
This is an HDR, so that means I started out with 3 separate exposures by bracketing the camera at (-2, 0, +2). Here are the 3 exposures:
 -2
-2
0
 +2
+2
First thing to do is open these 3 RAW images into Photomatix. I use Photomatix for all of my HDR’s. If you are interested in buying Photomatix, use the coupon code “malcolmphoto” for a 15% discount! It’s already at a great price ($99) and even better with the discount.

Once Photomatix has finished processing, I’ll tonemap it using the “Details Enhancer” option

(just noticed my screen grab cuts off the top of the settings, the two that are cut off are Strength @ 100, and Saturation @ 82)
Now we head to Photoshop…

So here we are, and the first thing I want to do is get rid of all that yellow. I thought I liked the saturation levels in Photomatix, but changed my mind – so I open a saturation adjustment layer and decreased the overall saturation quite a bit:

Next I open a Levels adjustment layer:
 Here I clicked and dragged the little black triangle on the left in until the “mountain” started. I also wanted to lighten the image some, so I slid the gray triangle to the left some.
Next I add a typical Curves adjustment layer to slightly increase contrast:

There are so many different ways to do the same thing in photoshop. I was really trying to lighten this image so I did a Brightness/Contrast adjustment layer. I increased both amounts a little. This really has a similar affect on the image as a curves adjustment or a layers adjustment.

Now, I still was not happy with all the yellow in the ceiling so I opened another saturation adjustment layer:
 Notice that I used the drop down menu and selected “Reds” – this will desaturate only the reds in the image. I also desaturated the yellows by the same amount (not shown). Also notice that I didn’t want to desaturate all of the image. So after I made the adjustment, I filled the layer mask with black. I then grabbed a soft, white, low opacity brush and “painted” white back on the layer mask over the areas that I wanted desaturated.
Next, I still wanted the image brighter in some parts so I opened a new layer and filled it with 50% gray. Once you do that, put the layer in “Overlay” blend mode. You’ll see that the gray “disappears”. Now, grab a very low opacity (for this I usually set it to less than 10%) and paint on the layer with white or black. White being areas that you want to lighten and black being areas that you want to darken.

Next I wanted to increase saturation to enhance the stain glass windows. So, open a saturation adjustment layer and slide the saturation to the right. Fill the layer mask with black and paint over the windows with white (making sure you are painting on the layer mask).

Now I want to straighten it by going to Filter, Lens corrections:

Now it’s looking better!
Only a few things left. The next thing I did was run a noise reduction filter. I use a plug in from Imagenomic

And finally I sharpen using Filter, sharpen, unsharpen mask:

And that’s it!
Here is the final product
Thanks for looking! I hope you found this helpful. Please ask questions if you have them, I’ll try by best to answer.
See all my other tutorials HERE
I’m on Facebook! Check it out and become a fan!
Remember,
If you want to know “How I Did It” for any photo on my flickr photostream, leave me a comment on this page or send me an email. I’ll be glad to make it my next “How I Did It” entry!
Also, as I mentioned in my first How I did It post, here are some helpful links for learning more about HDR:
Stuck in Customs
HDR Exposed
HDR (a flickr group)
Tutorial Collection at My First HDR flickr group
Helpful links for learning more about Photoshop:
Photoshop Support Group
Photoshop Tutorials by Allan Gengler
Actions by Allan Gengler
CoffeeShop Actions

What a tough week to pick a lead shot, I wanted to put all of these first! Tuesday and Wednesday morning were both stormy/rainy which made for some great HDR conditions. Here are some others from those two mornings:


 It’s me 🙂
A couple of other non-hdr from Wednesday morning:

Who says turtles are slow!? This guy was moving quickly across the path


The sun was back out in full force on Thursday. I spent my entire lunch break there trying to capture a leaf in mid air falling from a tree. It took around 100 shots but I finally got this one:

Not exactly the composition I wanted but I am more than happy to settle for it! A very tough shot to get…
I went back Friday at lunch and just wanted to capture some fall color:


And that’s it for the week!
Thanks for looking!
Check out all the previous weeks by Clicking HERE
Don’t miss a week! Subscribe to this blog and you will receive an email every time I post something new!
Malcolm MacGregor Photography is now on Facebook, check it out and become a fan!
All of the “This Week at the Lake” photos are available for purchase as fine art prints and a portion of the proceeds will be donated to the Friends of Radnor Lake! Send me an email for more info (m_macgregor@comcast.net)

So the family and I were riding home after a competitive game of disc golf at a local park, when I glanced at a field we were passing and I noticed a very large Red Tailed Hawk sitting on a hay bale.
We turned around, and I thought I would get out of the car down the road some and walk to a tree line to see if I could get a shot of the hawk. Well, we stopped a little closer than I wanted and as soon as I made it to the edge of the road, the hawk flew away. I believe he was watching me as soon as the car stopped! I continued on to the tree line to see if could find where he flew to but I saw him soaring far away.
By now, 10-15 minutes had passed and, as I began to head back to the car (where my wife and kids were waiting), I noticed the sky was really taking shape to produce a nice sunset. I convinced them we needed to stay a few more minutes, and this is the result:


 I had to get one more as we drove away!
Even got a couple of the family:


I have another RFI as we call it in the construction industry, or a Request For Information. Someone asked how I processed a particular image, so I promised a tutorial – so here go…..
In this tutorial, I’ll show every step I took to turn this:

into this:

——————————————————————————————————————————-
Obviously, this one is an HDR image. Unlike some of my other tutorials, there is really not much processing involved after photomatix. The only difference here (and it’s an important one) is the number of exposures used. For this shot, I used 5 exposures instead of my normal 3. The reason for this is the huge difference in light from the inside of the hotel room and the outside sunrise.
The 5 exposures I used were (-4, -2, 0, +2, +4)
Here are those 4 images:
 (-4)
(-4)
 (-2)
(-2)
(0)
 (+2)
(+2)
 (+4)
(+4)
You can see how the images gradually get brighter and end up encompassing the entire range of the scene. These 5 RAW images were then loaded into Photomatix. I use Photomatix for all of my HDR’s. If you are interested in buying Photomatix, use the coupon code “malcolmphoto” for a 15% discount! It’s already at a great price ($99) and even better with the discount.

Once Photomatix created the HDR image, I tonemapped using the Details Enhancer option:

On a side note – My Detail Enhancer settings are available to be viewed for EVERY photo in My HDR set on Flickr – here’s how
On the photo page, click on the top right where it tells what type of camera was used:

That will take you to the images “exif” info:

Scroll down, and you will see a section that looks like this:
 These are the Photomatix settings, they are automatically embedded in the files information. Cool huh? So now you know…..
Back to the image in question, here we are starting in Photoshop CS2:

The first thing I always do it a “Levels” adjustment layer:

Then a “Curves” adjustment layer:

And then I use Imagenomic for noise:

Here is the final result:
And that’s all there is to it for this one! Piece of cake!
Now go out and shoot some HDR and let me know how they turn out!
See all my other tutorials HERE
I’m on Facebook! Check it out and become a fan!
Thanks for looking! I hope you found this helpful. Please ask questions if you have them, I’ll try by best to answer.
Remember,
If you want to know “How I Did It” for any photo on my flickr photostream, leave me a comment on this page or send me an email. I’ll be glad to make it my next “How I Did It” entry!
Also, as I mentioned in my first How I did It post, here are some helpful links for learning more about HDR:
Stuck in Customs
HDR Exposed
HDR (a flickr group)
Tutorial Collection at My First HDR flickr group
Helpful links for learning more about Photoshop:
Photoshop Support Group
Photoshop Tutorials by Allan Gengler
Actions by Allan Gengler
CoffeeShop Actions

Lot’s of photos this week! I visited Radnor Lake in Nashville Tennessee on Tuesday, Wednesday, Thursday, and Friday.
Wednesday morning was rainy, so I walked down Otter Creek Rd. I headed to one of the best spots at the park to get a lakescape. I’ve got shots from this spot on Week 13, and Week 16, and Week 19. This time it was different with the dark rain clouds:


Heading back to the car, I got this shot right before it really started raining hard:

I went Thursday mid-day. The temperature and humidity have dropped considerably from last week, as you can see from this photo with the nice blue sky and fluffy clouds:

Then I went Friday early morning. I started off heading to the spot that I got shots for Week 15 and Wee 22 and I got this:

While setting up for this shot, I heard a loud crash maybe 10 feet away. I look over and there is a young buck staring at me. Then another comes to the shore and then some does arrive. I snapped this shot and then backed up from the shore and switched lenses. I’ve been looking forward to the fall, hoping I could get some shots of bucks. These may not be very impressive bucks but they are certainly the best I’ve seen so far. I ended up following them along the trail for nearly a mile, grabbing many shots:


 This is one of the does
 Got the idea for this shot from a Matt Hansen photo. I’m not sure I pulled it off nearly as well as he but I still liked it.


 Loved this one too!

 Last one!
On the way back to the car I stopped at the dam where I usually see green herons. Sure enough there was one there, I only grabbed a couple shots before he was scared off by other walkers:

Thanks for looking!
Check out all the previous weeks by Clicking HERE
Don’t miss a week! Subscribe to this blog and you will receive an email every time I post something new!
On my way home from work yesterday, July 13, I stopped to get a few shots of a rain storm.

You could actually see where it was raining and which direction the storm was moving. I sat and watched it move left to right in front of me.


I pulled out the zoom lens for this one. The sun was setting behind me and was not obstructed by clouds so the light on the green farm was amazing! It really made the green glow against the dark bluish gray sky

